
I recently got confused while trying to calculate the minimum and maximum contentOffset of a UIScrollView. This came into play while working on a feature that automatically scrolls off-screen content into view when an item is dragged to the top or bottom of the scroll view. I've supported this feature in Taskboard's project view for a while, so I copied that code into my new app. During testing I realized I've had a bug in this code for several years: my max offset calculation was incorrect. The issue was even more pronounced when a non-zero bottom inset was applied to the scroll view.
I started sketching out various configurations of content within a scroll view, considering content insets and situations with less than or more than a full screen of content. It took me too long to figure it out, partly due to a misunderstanding of what the contentInset means.
Some key things to remember when dealing with UIScrollView:
The scroll view bounds and contentOffset are related: setting the content offset is same as adjusting the bounds.origin. In fact, the documentation for UIView mentions adjusting the bounds origin as a way to display a different area of a view.
On the screen, the bounds rectangle represents the same visible portion of the view as its frame rectangle. By default, the origin of the bounds rectangle is set to (0, 0) but you can change this value to display different portions of the view.
Next, keep in mind the essence of the scroll view:
The scroll view must know the size of the content view so it knows when to stop scrolling; by default, it “bounces” back when scrolling exceeds the bounds of the content.
Finally, remember what the contentInset does:
Use this property to add to the scrolling area around the content.
My problem was due to conceptually applying the bottom inset at some point beyond the bottom of the frame even when the content size was much less than the bounds size. I should have gone back to the docs to confirm my understanding.
The minimum content offset is typically 0, which makes sense. If a top inset is applied, this has the effect of permitting additional scrolling up past the minimum, not to exceed the top inset amount. Whether you have a small or large amount of content, the min-y offset is 0 - top.
The maxmimum offset is the amount you'd need to scroll in order to just see the bottom of the content. If your content extends 5pts beyond the bottom of the screen, you'd expect to have to scroll 5pts in order to make it visible. With that in mind, consider the amount of content beyond the visible bounds as: excess = content - visible. If excess is less than zero, it means the content is already visible. Factor in any top or bottom insets by thinking of them as additional regions hugging the top and bottom of the content. The effective content excess is then top + (content - visible) + bottom. If this is negative, everything is visible and the max-y offset is the same as the min-y offset. If the effective excess is greater than or equal to zero, some scrolling is necessary to get to the bottom: that amount is just the excess.
In simplified terms, the min- and max-y offsets are:
min-y: -top
max-y: miny + fmax(0, excess)
Today I set up a simple project to test iCloud with Core Data sync (the last time I worked with iCloud+CoreData was back in iOS 5, and I wasted months an indie developer can't afford to waste). I ran into some issues and couldn't get anything to sync. The iCloud debug gauge continually reported a status of Disabled, so clearly something was amiss.
After several hours of playing with provisioning profiles and resetting my iCloud documents and data for the test app, I took a break and started trying to fix the latch on our Accord's glovebox. When Curry Honda did some recall repairs for the airbags, they didn't attach the pneumatic latch and the plastic hinge cracked. I didn't notice for months as we hardly open it. The result is that the glovebox closes awkwardly. I used some superglue and, later, Bondo and found a dubious solution.
Once I was done with that I sat back down to work on the sync project. I started the Simulator and logged into my iCloud account. Previously I had been testing on actual devices. After logging into iClound in the simulator, I saw some records appear. Things seemed to be working, for some reason.
I ran the app on my devices and saw the records appear. Logging into iCloud on the simulator spurred the system into action. Or maybe it was the huge delay from my earlier testing.
Even so, the iCloud debug gauge continued to report Status: Disabled.
Eventually I found a post on the developer forums dated August 2014 that mentioned a bug with the gauge.
Please ignore the 'Disabled' status, it is a bug that is being tracked.
I put too much faith in the tools. Ideally I'd have done a better job investigating log messages (or found the forum post earlier!) and realized the status couldn't be correct.
I submitted a new Taskboard update to Apple yesterday. While there are a few fixes in the release, the main feature is custom backgrounds. You can pick any photo from your Photos library. If you're not a good photographer, try some iPad wallpapers. It's fun to play around with different backgrounds. If you have the Projects add-on for Taskboard, you can of course set a different background for each of your projects, and those become the cover photo for the project.
Here's an updated app preview video with a screenshot of the newer feature towards the end. Turn your volume down if you don't want to hear the background music. I forgot to adjust the background music levels for the video, so I'll likely fix that in the next version of the preview.
I've been working on adding support for custom backgrounds (photos and solid colors) in Taskboard. Hopefully the work will prove worthwhile; I thought it'd take a few days to build but it's been more like a couple weeks. The update will also include bug fixes for issues that have arisen with the latest iOS releases. I've been supporting iOS 7 in many of my apps but it's getting more difficult to justify the time and testing required. The Taskboard 1.1.5 update will probably require iOS 8.0 at minimum.
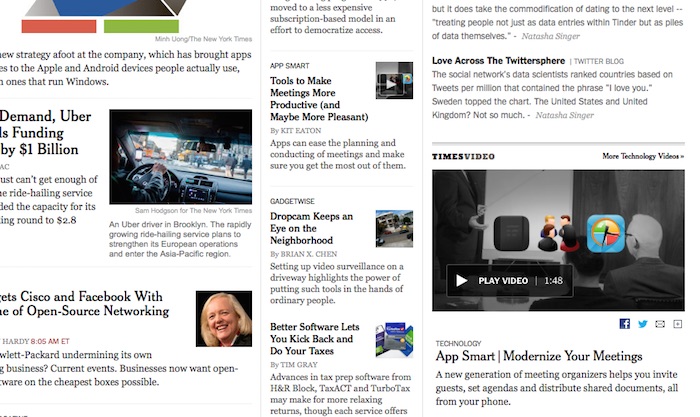
I'm stuck trying to find the cause of a rare but serious issue in Taskboard. It's the one thing holding the next update up and as the work is fairly nebulous and unpleasant, I keep procrastinating. To that end, I was just reading the New York Times when I noticed an article on tools to make meetings more productive. I clicked through to see some of the things others are doing with meetings apps. I read the name of the first app and felt my stomach drop. My eyes jumped around the page, looking for evidence that this was someone else's app. I hovered over the iTunes link to be sure. Meetings is in today's New York Times!
Though Chronicle looks different than it did several years ago, it still allows you to export and import backup files so you never lose your data.
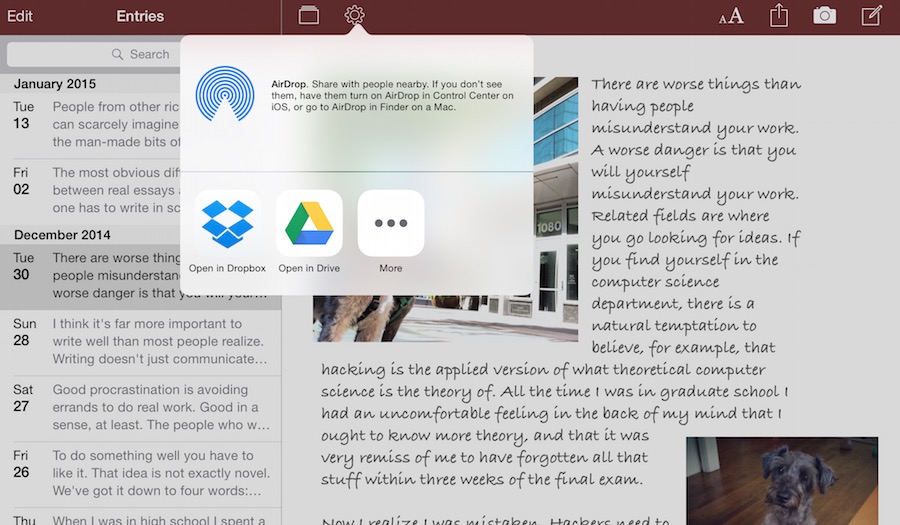
To backup all entries at once, tap the settings gear and then tap the Backup All Entries button. The app will begin writing a backup file to the Documents area of your device. When the file is written, the app presents a menu that lets you save the backup file to another app on your device. You should see storage-related apps appear; for example, Dropbox, Box, or Google Drive.
If you don't want to save the file to another app, tap outside the menu to dismiss it. You can connect your device to your computer and open iTunes File Sharing to save the file to your computer. Learn more about that below.
If you want to backup some entries, you can. This is is useful for moving entries to another device or moving some entries into another notebook.
To create the backup, tap Edit in the entries list. Tap to select the entries you're interested in. Finally, tap the export/share icon to generate the backup. Chronicle again presents a menu of system-supported ways of exporting the backup file. You'll need an app capable of opening generic data archives installed on your device (for example, Dropbox or Google Drive).
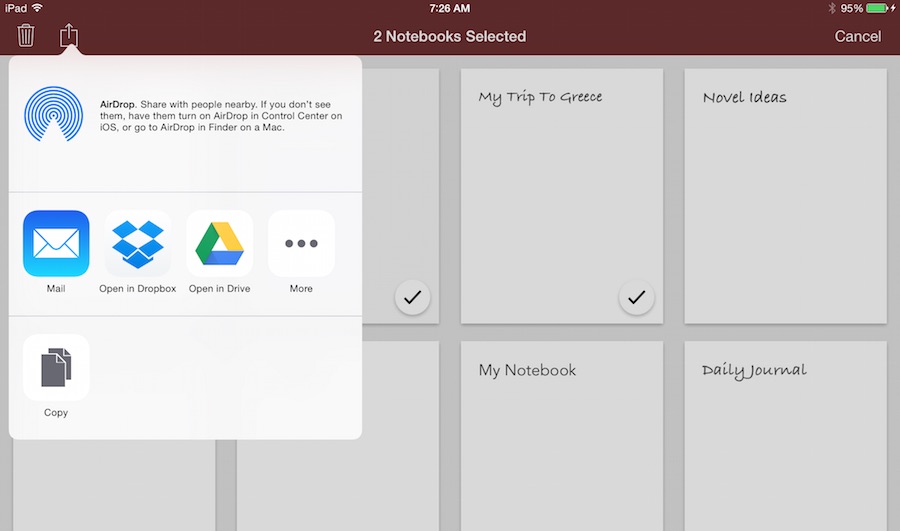
If you have the Notebooks add-on installed, you can tap the notebooks icon on the top toolbar to get to the notebooks screen. Tap Select to select the notebook(s) you want to backup. Finally, tap the export/share icon to generate the backup file.
Some apps have a documents area that they share so you can access files. To get to this area, connect your device to your computer and open iTunes. Select the device icon to pick your device, then click on Apps in the sidebar. Scroll to the bottom of this window to get to the File Sharing area.
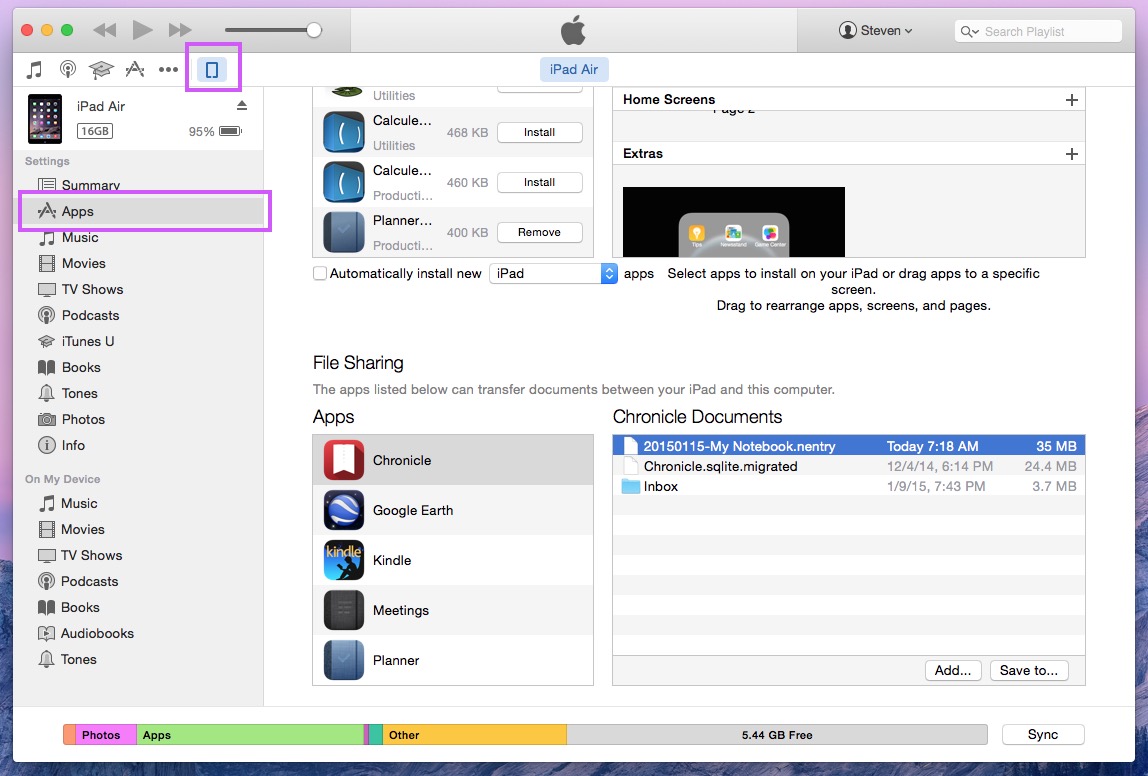
If you didn't save your backups to another app as described above, you should see your backups in the app documents list. Backups containing one or more entries end in .nentry and backups containing notebooks end with .nbackup. You can drag these to your computer for safekeeping.
To import a backup file you rely on the "Open In..." functionality of iOS and pick Chronicle to open the file. If you saved your backup to Dropbox, you can open the Dropbox app and browse for the file. Then tap the export/share icon. You should see several options, including "Open In...". Tap that and you'll see a menu with apps capable of opening the file. Currently only Chronicle can actually open .nentry, .nbackup, and .backup files, though other apps may show up in your list.

The screenshot above shows me opening a backup file using the Dropbox iPad app.
If you email yourself a backup file, you can press-hold on the file attachment and select "Open In..." from the Mail app.
If you've used Chronicle for years, you probably have some old backups ending with the .backup file extension. Chapters for iPad also generates the same backup file format and you may have some of those.
To import these, the steps are the same as those outlined above. Open the file from another app, such as Dropbox, or email it to yourself and use "Open In..." on the file attachment.
Keeping your writing safe is the most important job of a journaling app. As its developer, I strive to test any changes related to Chronicle's data storage thoroughly. As iOS grows in complexity and Apple releases more devices, it's harder to anticipate everything that can go wrong. Creating backups within Chronicle is your first line of defense. These files are easy to import and contain all of your writing and photos.
If you don't have any backups from the app (ie, .nentry, .nbackup, or .backup files), you can try restoring from your most recent iTunes or iCloud sync backup. Learn more about restoring a previous backup.